Showing posts with label Terrain. Show all posts

Sunday, 27 December 2020

Countryside Infinity Terrain Guide: How to get your map together

After reading all the different points and thoughts about terrain in Infinity, you are hopefully eager to build your own terrain. In this last part of the guide, I want to give some different ways to get your map together a closer look. Since the cineastic and strategic experience of Infinity is strongly related to the terrain you use and it can impact the game in many different ways, as we discussed before, it is important to get the right terrain pieces to hand for your game. With the introduction of 3D-printing, lasercutting and a bigger community, the market of terrain in general and pieces designed for Infinity has grown a lot over the past years. But besides this, there are many opportunities to let your own creativity and hands flow and build things on your own. While I am not a great terrain-builder and especially painter on my own, I want to focus more on the general aspects of different kinds of terrain, like what do you have to take into account when using it and for whom it would be good to use.

A general wrap-up

Before we discuss different options to get your map together, we should recapitulate, what we need. Since line of sight is an important thing in Infinity and everything dies instantly if it is seen from too many positions, you will need solid terrain to block firelanes. In most cases, you should cover at least 50% of the surface with terrain to block firelanes. This may be not correct for some special situations, but you can keep it as a rule of thumb. Once you have broken up firelanes on the ground level, you need some more pieces to structure the upper levels of your map, creating elevated positions to shoot from and blocking firelanes all over the same level. The third important part for your map is the smaller scatter terrain, including all the stuff you can throw into the corridors, on the roofs or wherever you need some more cover. Besides these three essential parts, there are some special terrain pieces you can include in your map, but you don't need to.

The different ways to get your terrain

Papercraft

The easiest and maybe cheapest way to get a majority of your terrain together is using papercrafted terrain. Since the terrain produced by CB directly and used in the old and actual Operation-boxes is based on paper, too, I will include it in this category. The other options here are self-printed and assembled pieces, or premade kits purchased from somewhere. The community already created a lot of general templates for different buildings, walls and even scatter terrain, which can be downloaded for free of for a small tax, but if you want something more sophisticated, you will need to look for special producers like CB or something different in the internet.
If you have found something suitable for your needs and want to start, the only things you need are a reliable printer, some ink, a scissor and fitting glue. Depending on the paper you use for the prints, the terrain will be more sturdy and you may be able to deploy heavier models on it to the cost of material-flexibility. But besides printing and assembling, there is not much work to be done until you can have the first games on your map, since the whole painting-step is already done.

Papercraft terrain in general has the following pros and cons:

+ cheap
+ easy to produce
+ big quantitity of bigger terrain pieces in no time
+ easy to store

- persistence of terrain under constant use
- stability when using metal miniatures
- light weight terrain (easy to displace during the game)
- papercraft-look
- takes a bit to set up

Icestorm

Until the release of Code One and Operation Kaldstrom, each Operation-Box for Infinity included a terrain pack of pre-painted papercraft terrain, consisting of four buildings and four to six containers, depending on the set. The buildings were discussed in the previous articles, since the smaller ones have the problem of being smaller than S7 models. But besides that, the whole terrain is easy to use and to scale up for a whole map. To build an interesting map for a 48x48 map, you will need at least four of these packs, where five or six will give you more opportunities. The combination of containers and buildings let you create different situations and break up most necessary firelanes.
Only the stackability of the buildings is a bit challenging, since they don't fit on each other to 100%. A bit of adjustment from your side may solve the problem. The stability of the terrain is quite okay for papercraft and can be increased with easy to build or to buy inlays for both pieces. This also may solve the weight-problem, since the pieces are normally quite light and easy to move.
If you keep the terrain flexible, it can be stored easily and without much space needed, but even if you don't disassemble the terrain after a game, it does not need to much space. Thanks to the regular shapes, it fits easily into storage-boxes. I would advice to keep the terrain assembled to reduce the impact on the material. The persistence of the material and the paint under constant use is quite good. My set is used constantly over the year and shows no bigger problems after more than two years now.
In summary you will need something about 100€, a bit of adjustment and a bunch of additional scatter-terrain to have an easy to store and to set up map.

An example of the Icestorm paper-terrain, where the higher building is slightly modified to stack better.
A block of polysterene connects the two single buildings to avoid anything crashing through it or the buildings falling apart.

A piece of fiber slab or a filled cardboard-box from CB can and should be added to the terrain to improve the stability and weight.


Kaldstrom

Witht the release of Operation Kaldstrom, CB introduced a new set of papercraft terrain. Compared to the former sets, it is improved in many ways. Instead of normal paper, thick cardboard is used, enhancing the stability, weight and persisctence. Also the content is changed. Now not only containers and buildings are included, but stackable buildings from different sizes and different kinds of scatter terrain. These positive changes nevertheless resulted in two disadvantages: The prize increased by app. 10€/set and the assembling seems to be way more difficult. To avoid damages during the assembly, check out Youtube for some tipps and tutorials!
While the old papercraft-sets were quite uniform in pieces and design, this is now changed. Not only that the variety in the core-set is increased, but there are also expansion packs with completely new pieces in it, like an objective room or some sniper-towers. This will allow you to create different kinds of maps with a basic set of pieces and single special ones from the expansion packs, depending on your needs.
Since I don't own this terrain by myself, I have no first hand experience about storage and persistance. The community advices something like four to six sets of this terrain to fill a 48x48 map, resulting in total costs for your map of app. 150€. Since the shapes of the terrain are still regular and the smaller pieces may fit into the bigger ones, it should be easy to store and easy to set up. 

Papercraft

For every other papercraft-terrain the pros and cons of the different CB-versions may also apply. In general, I see two possible approaches for papercraft-terrain: easy to store and easy to produce paper-terrain and persistent cardboard-terrain. Cardboard-terrain will live longer and will be easier to set up for the daily use, but will also be more difficult/expensice to produce and a bit more difficult to store, since you can't disassemble it easily and have to store it in bigger boxes. The easily printed and assembled paper-terrain on the other hand can be disassembled easily and so stored in quite small boxes. But this will force you to assamble it before every game and disassemble it after it, what will take a while and stress the material. Also it is easier to be deformed by use or storage over the time. Nevertheless, if you want to get started and make your first expriences, it is a great way to set up your first maps and then switch to other terrain-types.

An example of papercraft terrain, printed from some files of the internet on slightly thicker paper.

This box fits enough papercraft terrain for a whole 48x48 map.

MDF 

Most of the maps you see on social media (and even on TTS, thanks to the community) consists of laser-cut MDF-terrain kits. The market for those kits grew extremely over the past years and even free files to use with your own or rented laser-cutter get more frequent. Not only the whole amount of general sci-fi MDF-terrain is growing, but also special designed for Infinity-sets become more frequent (like from Warsenal, TTCombat or Micro Art Studios). This allows you to select the terrain fitting to your ideas and needs.
The kits come unassembled in a kind of sprue and need to be assembled, glued and painted. The overall quality of the kits is good, but sometimes you need some refinement during assembly to make everything fit perfectly. Painting may be a bit difficult if you don't own an airbrush or are experienced with spray paints, since the kits get more and more detailled. But even if you have to work with brushes, there are several tutorials for this on Youtube to help you with this issue. If you don't want to paint the terrain, there are some pre-painted kits on the market.
Most of the suppliers not only sell a variety of normal terrain, but also additions and special pieces, as well as scatter terrain. So you can purchase everything you need for your map made from MDF. Depending on what you want for your map, you will end up between 200€ and 350€ for the terrain and about 50€ for rattlecan paints, adding to some time you need for assembling and painting.
For this advances price you will get a good looking and interesting map. Due to the material-properties, all pieces have their own weight, limiting the potential of displacement during the game. Also, assumed a proper sealing of the paintjob, the persistance of the terrain normally is quite good and will guarantee several years of use (I have not seen any teared down MDF-terrain since now). Since there may be different shapes of the pieces, storage can be a bit challenging. This strongly depends on the series you choose, since there are also very easy to store kits, which can be stored easily in smaller boxes, including even the scatter terrain.

So if you don't have the time and/or creativity to build your terrain by yourself, but want an interesting Infinity-map, MDF-kits are the right thing for you. Just consider the needed time for assembling and painting all the terrain during planning. Since you can choose individual kits for your own map, don't plan to short. Many suppliers actually advice how much space you can cover with the kit, so you can plan more easily for how much terrain you will need. But most of the time, you want to reduce the amount a bit to safe time and money, but will end up with a to open map and less fun to play. So plan with the right amount of ressources!

There are many different MDF-kits available on the market, so that there are basic pieces of many kinds of maps.

3D print

Not only lasercutters are becoming more and more frequent in the hobby, but also 3D-printers for private use are a real thing now. These machines allow everyone to print everything out of thermoplasts or resin what you want - in theory. In theory, you now can design your whole map on the computer and then print it on your 3D-printer, put it together and paint it for the costs of the printer, the energy and the material. If you are used to computer-stuff and have some experience with vector-graphics, this may be your approach and in this case, 3D printed terrain may be the best solution for you. But in most cases the steps before it comes to the printing itself cause you some troubles, since most of us are no technical experts in this topic. Desiging your own terrain as printable files then is very difficult and rarely possible, while getting the printer online and working should be doable with some time to try out. Luckily the internet can solve the first problem for you, since it offers free and purchasable pre-made files you can use for printing. Over the past years there were many kickstarter-campaigns creating unique sci-fi files, but you can find a lot on pareon and thingiverse these days. If there is something fitting your needs, you have a great point to start. But even if you have found the files, you need to get them running and fit on your printer. In most cases, you will have to print smaller parts and put them together afterwards, since the private printers won't allow to print quite big pieces in one go. So in the end you will end up with okay-ish costs for your project but maybe the biggest time-investment of all options you have.
Once you have overcome the technical issues, you may get not only a nice looking map, but also terrain designed to use in wargaming. The material used will give most pieces enough weight to not be moved by accident and is sturdy enough to endure transport and storage, but also many games. Like wood or MDF, the material will be thick enough to let heavy pieces be placed on roofs and so on, at least of you have printed them thick enough.

On a side-note, 3D-printing may be the easiest way to create tons of scatter terrain and objectives like tech-coffins and antennas. So even if you don't want to print your whole map, take this option into account when it comes to the smaller pieces.

Selfmade

Depending on your idea for the map and all the other circumstances (time, money, motivation, creativity, talent), a selfmade map can also be an option, maybe the best. To generalise a bit on this topic, you can achieve the best results for your terrain with this 'method' and also with the lowest costs, for the sacrifice of time, creativity and talent. But since the last three points most of the time are the fun-part of the hobby, building your own Infinity-map is the coolest thing to do! In many cases you are forced to go with this, since not every setting can be done with MDF or 3D-printers. On the other hand you are able to create all the things you need, you can imagine and you need rulewise to allow the best interaction during the game. 


Since you can use different materials for your terrain, the persistance may vary together with the needs of storage. Normally you will build more detailed pieces with less durable materials or designs, so that you have to decide on your storage-solutions. If you store each piece individually, nothing will break but you need a lot of space. If you are short on space and have to put everything in one box, details may collide and irregular shapes won't match each other, so that there will be damages. On the other hand you have the chance to design everything in a way to match your own storage- and transport-situation.
 

The choice of material not only affects the persistance, but also the difficulty of production and the costs. The cheapest but also most fragile material may be cardboard. It is available for free in your trash, can be cut easily but is less durable when it comes to contact with other terrain and use.

Some hot-glue and cardboard from packaging can be brought together easily for basic buildings.

Many cardboard materials appearing in your flat can be used for Infinity-terrain. Just glue the boxes together and shield it with blank cardboard to even the surface and create ceilings.


More flexible and durable, but also a bit more expensive, is foamboard or whatever this material is called in your locallity. Here, I refer to polysterene blocks, which can be cut with a sharp knife or a hot wire (Proxxon Thermocut!!). The available tools allow you to cut many different shapes and things, so that there are no limits, once you are used to the tools. Problems with this material is the missing ability to use most of the rattlecan spraypaints directly on them, the missing weight of the material and the sensitivity to damages and breaks during the use and transport. A proper sealing may help you with all these issues. 


The most durable option may be solid wood, plastic card or plastic in general. These materials are not that difficult to use for basic shapes and things, but once you go for the details, you will see the limits. Depending on your supplies, this also may be the most expensive way, since you will have to buy everything and can't use things appearing in your flat.
Especially for scatter terrain, polysterene can be cut in many different shapes and sizes to create all the things you need.

Simple polysterene-blocks can be used and fenced with different structures to create buildings of different style and size.

Most of the time you will end up with all materials mixed, creating the look you want. If you are not super experienced in this field, you will need some additional time to plan everything, collect the materials and prepare for failure. In most cases, not everything will turn out in the way you dreamed about it, so plan b is quite common and you should be aware of this. But nevertheless, in the end you will have some great hobby-time and end up with an unique map, fitting your needs and ideas about the game.

Polysterene-blocks of different sizes covered with some cloth and lots of PVA make good and flexible scatter terrain.

Planters made of caps (bottles, rattlecans) and filled with different kinds of moss are also a cheap and easy option to create your scatter terrain. You can fill it with some metal-pieces to gain the needed weight.

To summarize about this topic:
If you are new to the topic and want to try out different things or don't have that much money left, go for papercraft terrain, especially the sets designed directly by CB. They will allow you interesting basic games for a small budget. If you want to advance from this, the solution depends on the factors of time and money. If you are short on time/motivation, but are willing to spend something like 300€, MDF-terrain is your way to go. The internet is full of available and great kits, so that you can find everything you need, If you are short on money but have some time left and at least some motivation (talent is optional!), try to build your own terrain. The included pictures may give you an example of how simple those things can be. If you are searching for some high-level inspiration, you can check out the forums or social media. But in the end, all these solutions will be fine for your game and can be used to display all scenarios you want to play.

Sunday, 13 December 2020

Countryside Infinity Terrain Guide: The trade-off between rules and reality


Maybe the most exiting thing about Infinity is the stunning terrain you play your games on. Even if you don't own one of these premium tables, you can find them shared all over the internet and sometime will find the place, time and money to build one yourself. Unfortunately, the best looking terrain or the most realistic terrain may cause problems when it comes to the practical games, since the rules require certain considerations. To avoid the situation that you spent hours on your map and only see these issues in the first, long awaited game, I want to discuss these points in this part of the guide.

Cover

Before the cover-rules changed in N4, 30% of the actual silhouette of a model needed to be concealed to get cover. This set the height and width of most scatter terrain, since it was quite useless in game-terms, if a S2 model is not able to get cover while standing behind it. With N4 there is no given percentage, but only that a part of your silhouette is concealed by the terrain you are touching. In this case, the new edition lowered the error-potential while building the right terrain a bit. Before the planter you wanted to use as scatter terrain needed a specified minimum size and even if S2 would gain cover, the next S4 unit maybe won't get cover there. Now even a small water hydrant gives cover to everything hiding behind, even a Maghariba Guard.
In the same way, N4 changed the cover-rules for units on elevated positions. In N3, your trooper needed to be prone on an elevated position to get cover, or stand on any kind of handrail. While being prone on an elevated position limits your LoF in many ways and causes misunderstandings, handrails are not usable or nice on every piece of scenery. Not every roof is designed to walk on it, mointains or bigger rocks rarely have any handrails and whatever weird situation there may have been...Now it is solved, since you only need to be higher than the trooper you are interacting with. So your troopers can walk on any kind of roof and rock-formation you are planning. But before throwing away all your handrails, make sure to have other horizontal structures to grant any kind of cover against troopers on the same level.

Scarface on the right now gets cover from everything on the ground level. Thanks to the small planter, a part of his silhouette is covered even for things on the same roof. On the other hand, the Uhlan on the left has free sight on Scarface. Take this situation into account while setting up your map.

Placing

Besides cover as one former important point to consider for your map, the necessity to be able to place a model somewhere may be the most important thing to consider while planning and building your terrain. The issue of placing occurs whenever you are building any kind of non-standard terrain. Espcially if you want to work with rock-formations or anything similar, you need to make sure that every model you want to be there is able to be placed somewhere. It isn't that important anymore that the whole path is wide enough to fit the base, but to make terrain playable in this term, there needs to be a place big enough after a narrow path. This path should not be longer than 4", maybe in some rare cases 6", so that there are places where troopers can move to with their build in MOV. If this isn't planned properly, troopers may only cross the terrain with two short movements and have no opportunity to react to the AROs they will produce, since they can't legally stop their movement in the path. Nevertheless, you can always use this kind of problem to design paths not suitable for bigger units like TAGs or REMs, if you think this would be necessary.
One last thing to consider regarding placing issues are te highest points of your map. Sometimes you build rock formations or even buildings higher than the rest of your terrain. In most cases, this generates really fancy sniper spots, which can't be accessed from the ground. To avoid this, make sure to either design your terrain in a way that you can't place a model on this pieces, or that it is clear for everyone, that deploying there is forbidden. 

This hill is designed to minimize placing problems and avoid miniatures falling down. While Saito can be placed nearly everywhere here, Scarface can't legally take the current position, but cansimply vault over the hill to a position, where he can be placed.

Interaction

Rulewise models use and interact with terrain most of the time when they are vaulting over obstacles, climbing on things or jumping from one point to an other. While climbing and jumping are more or less designed to deal with specific terrain-situations but are quite order intensive in most cases, vaulting is the short-cut for this. Rulewise a model can move over or climb on obstacles without any restrictions, if the obstacle is not higher than the silhouette of the active model. In many cases you want to make your buildings and other higher terrain-pieces more accessable while also lacking some ladders to fulfill this role. For this situation, the vaulting-rule allow you to create easy access-points for normal troopers by stacking some smaller boxes or creating other stacked structures. This also adds new combinations for cover to your terrain. On the other hand you need to make sure that bigger units, especially TAGs can't go everywhere without any difficulties. This is an issue with the old Icestorm-terrain, since the buildings are slightly lower than S7 models, so rulewise every TAG can just move over them. While building your own map, take care of these two problems and choose the right height for your terrain.

The old papercraf terrain from Corvus Belli is slightly smaller than S7, so that TAGs can simply vault on the buildings and containers. Take this into account to determine where things can move easily and where not.

Line of fire

Of course, some of the previous points already interacted with different situations of LoF-issues, but there is an other specific one to point out. In many situations, you want to spice your terrain up with more irregular terrain, altering the standard box-shape. This can be a walkway, a forest or some kind of industrial plant. But while leaving the box-shape with defined volume, there will appear holes and unblocked corridors within the terrain piece. This is also valid for buildings with windows, where you intentionally can draw LoF through the whole building. I would assume that these kind of LoF-issues is the most common reason for arguments and kind of gotcha!-moments in Infinity, since it is played differently everywhere and so is up to interpretation.
This overall problem could only be avoided if you build complete consistent and clear terrain. Unfortunately, this will be quite boring in general and would let most of the beauty of the setting unused. So please continue building cool terrain, but I heavily recommend to try to design the terrain as clear as possible, considering the different possible interpretations and ways to use it and in the best case note some instructions to be handed out on the table.

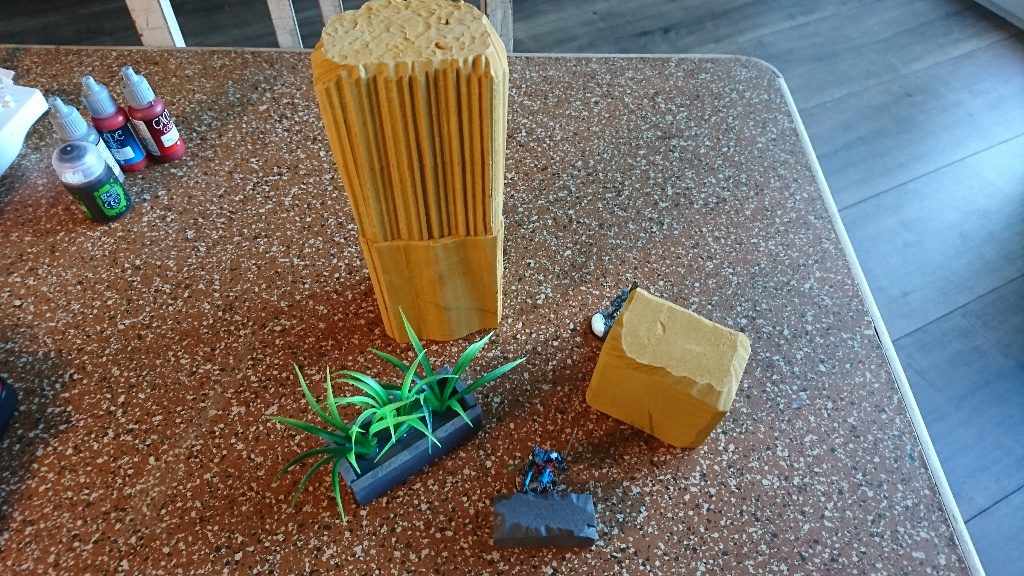
This high pillar is a premium place for every stron ARO-unit and also fits at least S6 units. If there is no ruling or clarification about deploying there, you can break your game easily.

This building illustrates several issues with terrain and LoF. Not only that it is totally open on each side, so that units can draw LoF easily through it, it also shows how terrain which is designed to block LoF can fail with this, if you don't clarify it. Be clear about the use of real LoF or home-rules and take those possible LoF-issues into account.

Clarity

The previous LoF-issue may be the most common problem of clarity on Infinity-maps, but they can and will occur in every non-standard situation. If you took all the previous points into account while desgning your terrain, you will have avoided a lot of discussion. But nevertheless, there will always be situations where the exact ruling or practical use of a piece of terrain is not 100% clear. But since the game itself is quite complex and works a lot with pre-calculating interactions, uncertainities regarding terrain-pieces really should be minimized. To do so, try to design the terrain as clear as possible and wherever this is not possible or wanted, give some easy to understand advice or instruction to the players. To talk through a map before the game really should be the standard procedure for every player, but we all know how things go sometime. So prepare two papers with short instructions and store them together with the terrain. In that way, the information is always available on the map, when it is used for a game.

Sunday, 6 December 2020

Countryside Infinity Terrain Guide - Special terrain to spice up your map part II


The right representation

According to the rules, you need to define the zone for the special terrain you want to place. With this, it is easy to determine when you enter silhouette contact and when LoF crosses the zone or not. For your game, you should take care of fitting terrain-zones like cut bases or detailed ponds for example. But in many cases, some paper can do the trick, too. Without such a clarification, a lot of confusion and arguing can appear, limiting your fun.

While creating the zones, you have to determine the size of each zone. This decision has a big impact on how the terrain affects the game. Not only that you need the space to place bigger zones, but also the amount of LoFs crossing it are influenced by the size. Keep in mind that you don’t create classic full cover. You can either walk through it or you can shoot through it. And in most cases you won’t get any cover on it. If you have many small zones or some big zones of special terrain, the map may become quite open in many cases, or at least becomes too open if MSV-units show up.
Besides the area of your special terrain zones, sometimes it may be necessary to define the height of the zone. This won’t be necessary for difficult terrain, but once you work with visibility conditions and saturation zones, you need to define at which height the conditions may end. Once there is a LoF drawn unobstructed from one point of the silhouette of a trooper to another one, the effects of your terrain won’t apply and maybe arguments may start. So pay attention to your definition of height here to ensure that there is no space for arguments. Better define things a bit higher than needed, than defining them too short. 


In this case it is not directly indicated by the terrain, if the effects for shooting through apply for the Black Friar or not.


On the other hand, you can use different heights to create more interesting terrain pieces, like a cereal-field with S1 height as zero and white noise visibility conditions. Troopers may crawl through it unseen, while everything standing in it can be shot easily. 


This lower storage of the forest could be defined as S1 high zero-visibility and white noise-zone, to create new save paths.

To generally limit the impact of MSV units but also have some importance of visibility zones, I would advise to take a medium number of smaller patches for visibility zones. Planters are a good example here, but zones to the size of a circular template should also work, if it is limited to visibility and saturation. As a medium number you can take something around 3 patches of the size of circular template or five to six smaller ones.

Many small patches on the other hand will have no impact if you use them for difficult terrain. If they are too small, units can either simply go around them or cross them with one additional order. The opposite would be some large patches, at least of the size of a circular template, but most of the time bigger than that. The bigger those patches are, the more impact they will have. In most cases, two or three of those patches define clear zones where the special terrain determines the game, but also leaves some space for normal troops to be useful in the game.

If you combine both types, you either lose the impact of the difficult terrain, or create big patches without proper cover. It is a good advice to go with some medium to big patches of special terrain, if you want to combine different conditions. But then add some solid cover in these zones to limit the benefit for high-burst big guns on well trained or good equipped gunfighters. Place some solid rocks, where S2 units can hide in the zone or put some real trees in your forests. This kind of scatter terrain also allows you to create flexible fire lanes and break longer ones up where needed.


This map has four bigger forest-patches. Three of them define the narrow but more open left side, while the fourth seperates the two settlements on the right.

 
As there are trees placed in the forest-zones, not only solid cover is added to the zones to break up LoF, but also LoFs in the upper storage of the forests are broken, limiting some decent firelanes on this map


Next to the quantity and specification of special terrain, the placement is the third important factor, influencing the game. In general, you should use the special terrain to define what you want from your map. If there should be some spots with good LoFs to key-positions, you can place difficult terrain around that or on the path towards it. Or you can narrow bigger corridors down with difficult terrain, maybe with saturation zones, too. In this situation, terrain-specialists may have better access to this path, while the standard gunfighters and ARO-units are weakened.

In general, it is easier to break the game with the wrong quantity of special terrain, rather than breaking it by a wrong position. But again, you don’t create solid cover, maybe the most important thing in Infinity, by placing special terrain on your map. This means that you can’t replace your basic terrain with special terrain. Even with tons of special terrain zones, a too open map will stay open and hardly balanced in most cases. But if you have set up a thought through open map, special terrain can add additional value to it and spice up many interactions. So keep in mind, that special terrain should be used in addition to your normal terrain and not instead.  


Simply removing single solid terrain pieces often creates too open areas


Bigger patches with solid terrain in it mitigate this problem a bit, but still leave more area open as wished
 

The easiest way, especially in the beginning, is to simply add special terrain zones to your normal terrain


Once this is done, you can place the areas there, where you need them: some smoke from burning stuff in side-corridors to the main-streets, forests around a otherwise easy to access objective or some difficult terrain on the fast-lane towards one deployment zone to force units like Achilles into other, less favourable corridors. By doing such things, you can utilize special terrain to create different sides of the map. In most cases, the choice of side is made by oversight of the map or by easy to defend positions. By adding special terrain, the amount and quality of units in each player's lists to deal with given conditions, becomes a new factor.


Localized Decompression

The topic of special terrain and its influence on the game today can’t be completed without having a look at the new addition to the current set of ITS missions. In some missions, both players need to place two circular templates on the map, counting as difficult terrain (zero g) and saturation zone. Each of these templates needs to be placed outside of the deployment zones and somewhere they fit without interfering with other scenery. This requirement may cause some problems on its own on denser tables, but even with more scatter terrain on the map, it could be difficult to fit all the templates somewhere. If you are the one setting up maps for someone else to play such ITS missions, make sure there are fitting places, but also have in mind, that you can create special areas for those zones, shaping the game a bit more.


But how to utilize this new feature as a player? Independent to the placement, three effects may be applied: Reduced movement/order efficiency for normal troopers, increased movement for troopers with terrain(total) and terrain(zero g) and reduced burst for all BS attacks through the zone. These effects are valid for both players, so the aim should be to give your opponent most of the disadvantages on the one hand and on the other hand avoid those disadvantages for your game. To get this to the map, you need to search the major firelanes from your opponents deployment zone and the sweet spots for linked ARO-units. If you could place a zone intereferring in such corridors, you can take it to reduce the impact of linked units with sniper rifles and missile launchers. Another use of the saturation zone may be to reduce the potential of the opponents attack-pieces. This is mostly valid for weapons with B3, but if your ARO-unit is strong enough and does not rely on one shot more or less, also for B4 weapons. If you identify one or two sweet spots from where you may be attacked, the saturation zone placed there enhances the risk of failure for your opponent. 

An other way to use the zone against attack pieces is to slow them down with the difficult terrain. There are some alpha-strike units in the game, utilizing spitfires or other weapons with shorter rangebands, which need to leave some area behind without spending much ressources for this. If they need to cross the difficult terrain to get to your units, they might lose one or two orders there.

With all these options, it is important to not set up a trap for yourself. It will happen, that your units want to use the same spot or firelane to attack the enemy or want to use the same route to get as close to the opponent as needed. If you place the zones close to your deployment zone or around the center of the map, you will have to deal with the negative effects of the zones quite early and quite often. The better option is to place them as close to the enemy deployment zone as possible. This allows you to develop your position in the midfield and set up a strategy utilizing the zones, instead of figuring out how to leave your own deployment zone without getting slowed down and forced into bad situations too often. Your opponent of course will do the same, so in the worst case, you have two zones set up perfectly against you and also your own zones set up not that well. But if you manage to get them as close to the deployment zone as possible, your opponent will have to deal with them somehow. But as always, there is one more thing to consider: If you want to limit enemy ARO-units, you will also limit your potential to kill them, if you have no plan for a different engagement-route. So you need to pay some attention to this, before simply drop the zones in front of ARO-spots.

A last option to utilize the zones is to take them to increase the survivability of your units. This may seem odd in the first place, but in the end everything that reduces the burst against you increases at least your chances to survive. If you deploy a TR-bot or some high burst neurocinetics-units, you may be able to lose one shot. In some situations you still may have three shots against two from your opponent. But in most situations you may have B3 against B3, which only reduces the success-rate for both units. And since the biggest purpose of the reactive turn is to force your opponent to spend as many orders as possible, this is a great thing! The other defensive option is to protect your squishy terrain(total) specialists from heavy enemy fire by placing the zone somewhere around these units. In many cases they also have some visual modifiers on them, so opponents need to rely on their burst. This is reduced here, while you get no real disadvantages.


The saturation zone reduces the burst of both units, the TR-bot on the left and the SMR Druze on the right. But while the burst of the TR bot is only reduced by 25%, the Druze loses 33% and most of his odds in this situation

But once the Druze gets some support from his haris-team and has to face a linked MSR, the saturation zone alters the odds into his favour, since the Fusilier loses most of his linkteam benefits, which make sniper rifles and missile launchers that scary

The edge of the map allows units to reach the deployment zone in proper cover or has no good position to deploy defensive elements in there. The difficult terrain here is able to slow down such units a lot, especially when they need to enter the zones twice

Covered by the saturation zone, Saito Togan can reach the objective better protected or even can deploy there more savely, since enemy fire is reduced and stacks with his mimetism


To conclude this (longer than expected) part of the guide I want to point out all the unique and interesting interactions you can add to the game with special terrain. There are tons of different options and if you don’t fall to the major traps, they can be included into many games. Don’t try to replace basic terrain with special terrain zones, but add special terrain to general good maps. Also choose a small set of different terrain types to reduce the overall thinkload during the game and have all the added rules easy to remember. And as the last point, be clear about the size and the terrain-silhouette to don’t create arguable game-situations.

Sunday, 29 November 2020

Countryside Infinity Terrain Guide - Special terrain to spice up your map part I


While we now know how to set up interesting maps for competitive play or regular games, everyone may reach a point where some spice need to be added. Whenever you cross the idea of a campaign, you define your location and think about ways to bring the jungles of Paradiso to your map or how the caverns of an asteroid around Human Edge may influence your game. But even without interest in campaigns and such stuff, the new ITS 12 adds some terrain rules to certain missions. If you have read through the previous two articles, you now may know how sensitive the game-experience can be to changes in the terrain. This applies most of the time to the placement of your regular terrain, but special terrain with added rules also can have a big impact.


The most important step for this topic may be the knowledge of how special terrain works rulewise in Infinity and how units interact with this. Everything basic you need to know for this is written in the core-book on p. 133 and following, as well as p. 115. The section around p. 133 explains the different terrain special rules and p. 115 includes the terrain-special skill for your units. Of course, MSVs also interact with terrain-rules, but since it is a quite clear interaction and this equipment also interacts with other things, so it is not that important here. The core rules define three effect-types for terrain, besides the actual terrain-type like aquatic, desert or zero-g:


  • Difficult terrain - influencing movement of troops

  • Saturation zones - influencing the burst of weapons

  • Visibility zones - influencing LoF of troops


While in N3 every type here had different levels, only the levels of visibility zones are left in N4. Nevertheless you can combine all the different options, depending on what you want to achieve or what you need. To give you the needed information to properly choose between all these options, we will go through each type in the following.


Difficult terrain

Difficult terrain describes everything that limits the movement of troops. This may be a very rocky plane or a swamp where even a Morat is slowed down by the mud. The rules here are summed up as each trooper has to end its movement when entering silhouette contact with the terrain and needs to substract 1” from both MOV-values. In return, troopers with the fitting Terrain-special skill don’t need to end their movement by entering silhouette contact, ignore the limitations of moving in this terrain and gain 1” on both of their MOV-values. So in total, they become even faster, while everything else is slowed down in two ways. Altered moving speed on its own influences of course the order-efficiency for troops that want to move and reach more favourable places, but also exposes troops longer to AROs. This could be one additional shot from a long distance, one more chain rifle but most of the time one more attempt of spotlight or other hacking-programs.

Gainers of difficult terrain in first place are troops with the special skill, gaining quicker movement and the option to take paths too difficult for normal troops. In the second place all troops benefitting from slow opponents gain some more use. These are hackers, strong ARO-units and now CC-specialists with or without terrain-skills, since they can dodge with every ARO they get and ignore the terrain-limitations with this movement, except for the forced end of the movement by getting into silhouette contact (at least that is how I would read the current rules).So in the worst case Saito Togan appears in the forest you try to cross with your Azrail, engaging you directly.

On the other side, all units which need to reach places on the table and lack terrain-skills or high MOV-values get some problems with difficult terrain. In most cases you lose one short skill of moving by entering silhouette contact and depending on the size of the zone need one order more to cross the distance thanks to the reduced movement. If you then have nothing to protect you properly against DTWs or other AROs, like mimetism or dodge (+3), you have reached a wrong place.

One special thing for difficult terrain is the type you choose. We have many troops with terrain (desert) or terrain (aquatic) scattered unequally around the game, while terrain (zero-g) seems to be spread more equally (at least if you take the terrain (total) troops into account, too). So if you work with a lot of terrain from a not equally distributed type, you change the balance a lot.


Saturation zones

A saturation zone is filled with debris or other stuff, catching bullets flying through it. In this way, your burst is reduced by 1 to a limit of 1, if you are shooting through such a zone. It is important to note that the reduction is done after splitting burst, so a spitfire could shoot three shots into one target, or four shots against four targets, for example. For the moment there is no way to ignore those zones, besides having only B1 in general.

The reduction of the burst allone of course favours all units and weapons, which take their potential from high BS or other points and not from spamming shots. DTWs in most cases are not affected here and single missile launchers also see no difference by shooting through such a zone. Also weapons with high burst are not affected extremely by this reduction. Of course, B4 or B5 is better than B3, but in the end you still have two dice more than your opponent, which should do the job, if you engage in a good position. In short: actively, high B-weapons and link-teams with them deal good with those zones and may be a bit favoured by this. Reactive all vanilla-ARO pieces not gaining their value out of boosted B become better, since they are attacked by fewer shots now.

In return, natural B3 weapons like marksman-rifles or HRLs with natural B2 lose most of their advantage in active turn against the ARO-units. A link-team may reduce this impact a bit, but in the end, your engagements with these weapons become more risky. Also if burst is the only thing that shall win you the ftf-rolls, you may get some problems with saturation zones (like Krizas, Knights or Azrails). When it comes to the reactive turn, your linked missile launcher or sniper now suffer a lot, since the second shot in ARO is one of the most valuable things you have. If your defensive link-team needs to defend your ground through a saturation zone, it will be a quite ineffective investment.


Visibility zones

This kind of terrain has the most variation to offer. The core-rules distinguish visibility zones into the following:

  • Low visibility (-3 to BS)

  • Poor visibility (-6 to BS)

  • Zero visibility (no LoF through it)

  • White noise (no LoF for MSV-units)

It is important to note that MSVs cancel most of the negative effects of low, poor and zero visibility conditions and that the negative mod is not applied to dodge-rolls when you are targeted through such a zone. Thanks to smoke-grenades and the White Noise hacking-program, visibility zones can be created sometimes during the game and since many strategies or solutions for specific problems are including this, we are quite used to this type of terrain.

Besides White Noise, all visibility zones boost units with MSVs of any kind, since they get free reign about some LoFs and can use the good old smoke-trick even without spending orders to set up smoke first. If you don’t have to deal with zero visibility zones, full core-teams are boosted by this terrain, too. The +3 to BS-attacks limits the impact of the zone on your troop, while the target still has to apply it to his attack. This increases your chances actively and makes your ARO-snipers really hard to remove. Depending on the amount of MSVs on the field, also mimetism-troops and troops which act better in mid- to close distances can benefit from additional visibility zones. The mod stacks with the native mimetism on the one hand and may boost or guarantee your survivability against AROs while getting into the positions you want to start working.

While troops with mimetism may benefit from additional visibility zones, a high amount of MSVs on the field or at least one good placed MSV can also limit your use of these troops. If solid cover is replaced by visibility zones, you are losing all your protection without any benefit. Besides this situation, long range weapons and units without top-notch BS stats lose a lot of their potential. Even if both sides suffer additional negative mods, the success-chance of both units is reduced. This may be good, if you just want to survive while crossing a gap, but if you want to take out a target, you need to invest more orders for this, if you are able to hit the enemy at all. 


Special terrain in practice

Most maps in practice show that special terrain is difficult to use or most of the time not used because of the complexity. Probably the theoretical part has reinforced your concerns about this topic. It is true that you easily can create unbalanced situations by using these rules. But on the other hand you skip a lot of the fun Infinity has to offer, if you don’t use it. The next part shall try to give some advice on how you can use these rules without breaking the game.


Possible combinations and definition of terrain

Since there are only three different types of special terrain, the overall rules are quite simple. But then you are given the choice to combine the three types of terrain and label them in the way you want or need, creating a high number of possibilities. You can have difficult desert terrain without any further things or a difficult, poor visibility saturation forest zone, a White Noise zero g zone and so on. In many cases the map you want to create at least gives you a limited set of wanted terrain, like some desert-patches on a Bourak-styled map, or zero g terrain in a cargo bay. From this reduced complexity, you can start and tailor your terrain to what you want to achieve. A very important factor here is to keep things as simple as possible, at least if you don’t plan to prepare a week before for the game. Infinity has a lot to remember and to think about during the game, so the added terrain rules should be well communicated and not too numerous. Too much complexity and diversity would lead to non considering the rules, which you don’t want to achieve. Keep things simple and clear and according to your goal.


Joining the wrong neighborhood [DBS vs. CA]

Even if it went very quite here, I have not quit playing Infinity. Nevertheless, we joined some other systems (Dystopian Wars, Dropfleet Com...